- Overview
- Configuration
- Technical
-
RFC 1305
- 1. Introduction
- 1.1 Related Technology
- 2. System Architecture
- 2.1 Implementation Model
- 2.2 Network Configurations
- 3. Network Time Protocol
- 3.1 Data Formats
- 3.2 State Variables and Parameters
- 3.3 Modes of Operation
- 3.4 Event Processing
- 3.4.1 Notation Conventions
- 3.4.2 Transmit Procedure
- 3.4.3 Receive Procedure
- 3.4.4 Packet Procedure
- 3.4.5 Clock-Update Procedure
- 3.4.6 Primary-Clock Procedure
- 3.4.7 Initialization Procedures
- 3.4.7.1 Initialization Procedure
- 3.4.7.2 Initialization-Instantiation Procedure
- 3.4.7.3 Receive-Instantiation Procedure
- 3.4.7.4 Primary Clock-Instantiation Procedure
- 3.4.8 Clear Procedure
- 3.4.9 Poll-Update Procedure
- 3.5 Synchronization Distance Procedure
- 3.6 Access Control Issues
- 4. Filtering and Selection Algorithms
- 4.1 Clock-Filter Procedure
- 4.2 Clock-Selection Procedure
- 4.2.1 Intersection Algorithm
- 4.2.2. Clustering Algorithm
- 5. Local Clocks
- 5.1 Fuzzball Implementation
- 5.2 Gradual Phase Adjustments
- 5.3 Step Phase Adjustments
- 5.4 Implementation Issues
- 6. Acknowledgments
- 7. References
- Appendix A
- Appendix B
- Appendix C
- Appendix D
- Appendix E
- Appendix F
- Appendix G
- Appendix H
- Appendix I
- About
- Time Tools
| Previous Top Next |
Windows Time Client
Configuring PresenTense Time Client via DHCPIntroduction
DHCP is usually associated with obtaining an IP address for a computer however in more recent years, the protocol has allowed clients to request a list of parameters. The client is under no obligation to accept the options and this exchange of information can be done without the IP address of the host computer changing. In other words, using DHCP configuration for PresenTense Time Client will not in any way effect the operation of your network parameters and you can even have statically assigned addresses on your network and still use DHCP to configure PresenTense Time Client. Option 43 (vendor specific information) is used to deliver the configuration parameters to PresenTense Time Client. The format is BFxx:value: where BFxx is the option number and value is the value you choose to set for that option number.
PresenTense Time Client Exports DHCP Configuration String
New in version 4.2 of PresenTense Time Client is the ability for a configured client to export it's DHCP settings. This takes the hard work out of configuring clients via DHCP. You simply install PresenTense Time Client on a computer, set all options how you want them and click the button "Create DHCP server parameters from this installation". This button can be found on the Advanced Settings dialog and when clicked will show a dialog box similar to the image below.

The configuration string is copied to the clipboard as well as displayed on the screen. Once this string is configured on your DHCP server, all PresenTense Time Clients which are set to receive their configuration via DHCP and receive a response from the DHCP server will use these parameters for their running configuration after next restart.
Manual Configuration of the DHCP Server String
You can naturally configure the DHCP server strings manually rather than use the export function shown above. You will need to use the DHCP options section of this help file to learn which option numbers correspond to configuration options within PresenTense Time Client. The options are divided into two sections: DHCP Options 1-40 and DHCP Options 41-80. Below is an example of manual configuration.
Example
Set Option 43 on your DHCP Server as follows:
BF39:4:BF22:swisstime.ethz.ch:BF21:ntp2.sp.se:BF4:1:BF35:3
Explanation:
BF39 is the reference time source. Setting it at 4 corresponds to NTP4 time server.
BF22 is primary time source. In this case it is set to swisstime.ethz.ch which is an NTP server based in Switzerland.
BF21 is the secondary time source. In this case, it is set to ntp2.sp.se which is an NTP server based in Stockholm, Sweden.
BF4 is to enable logging and is set to 1 which is means logging will be turned on.
BF35 is log level. 1 is Minimal, 2 is Detailed and 3 is Errors Only. In this case it is set as Errors Only.
Checking DHCP Server Responses
Ensure that logging is turned on and that the log level is set to detailed. Click on the Log Tab and see which entries are present. A successful configuration via DHCP should look similar to the following image. Note that in this case, the blue skin was turned off remotely by the DHCP configuration so the interface has reverted to the standards Windows look and feel.
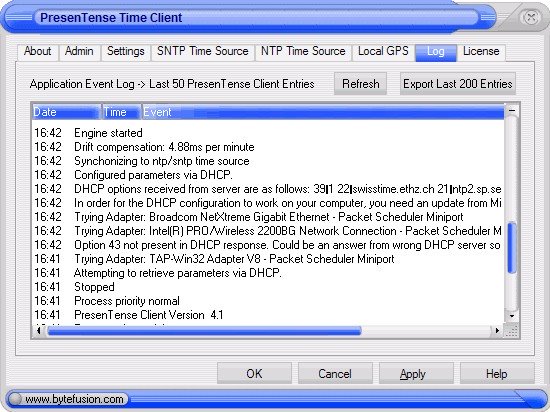
In the above example, you can see that PresenTense Time Client reports when it is attempting to retrieve parameters via DHCP. It also reports which adapters it is trying. The first entry at 16:42 is of interest above as it shows that there was a DHCP server on the network which the first adapter was connected to HOWEVER the response did not contain DHCP option 43. This is referring to DHCP option 43 (vendor specific information) and should not be confused with the PresenTense Time Client option 43.
PresenTense Time Client will show the options received from the DHCP Server in raw format. In the example above, you can see the options and values and that PresenTense Time Client was successfully configured.