- Overview
- Configuration
- NTP4 Plug-In
- Hardware
- RFC 868
- RFC 2030
-
RFC 1305
- RFC 1305
- 1. Introduction
- 1.1 Related Technology
- 2. System Architecture
- 2.1 Implementation Model
- 2.2 Network Configurations
- 3. Network Time Protocol
- 3.1 Data Formats
- 3.2 State Variables and Parameters
- 3.2.1 Common Variables
- 3.2.2 System Variables
- 3.2.3 Peer Variables
- 3.2.4 Packet Variables
- 3.2.5 Clock-Filter Variables
- 3.2.6 Authentication Variables
- 3.2.7 Parameters
- 3.3 Modes of Operation
- 3.4 Event Processing
- 3.4.1 Notation Conventions
- 3.4.2 Transmit Procedure
- 3.4.3 Receive Procedure
- 3.4.4 Packet Procedure
- 3.4.5 Clock-Update Procedure
- 3.4.6 Primary-Clock Procedure
- 3.4.7 Initialization Procedures
- 3.4.7.1 Initialization Procedure
- 3.4.7.2 Initialization-Instantiation Procedure
- 3.4.7.3 Receive-Instantiation Procedure
- 3.4.7.4 Primary Clock-Instantiation Procedure
- 3.4.8 Clear Procedure
- 3.4.9 Poll-Update Procedure
- 3.5 Synchronization Distance Procedure
- 3.6 Access Control Issues
- 4. Filtering and Selection Algorithms
- 4.1 Clock-Filter Procedure
- 4.2 Clock-Selection Procedure
- 4.2.1 Intersection Algorithm
- 4.2.2. Clustering Algorithm
- 5. Local Clocks
- 5.1 Fuzzball Implementation
- 5.2 Gradual Phase Adjustments
- 5.3 Step Phase Adjustments
- 5.4 Implementation Issues
- 6. Acknowledgments
- 7. References
- Appendix A
- Appendix B
- Appendix C
- Appendix D
- Appendix E
- Appendix F
- Appendix G
- Appendix H
- Appendix I
- Time Tools
- NTP Auditor
- About
| Previous Top Next |
Windows Time Server
NTP Time Source Time SourceStarting with version 3.5, PresenTense Time Server includes a plug-in which supports NTP version 3 & 4 according to RFC 1305. This plug-in is distributed with PresenTense Server free of charge. Use of the NTP version 4 plug-in is recommended. It ships with all versions of PresenTense Time Server, including the evaluation version.
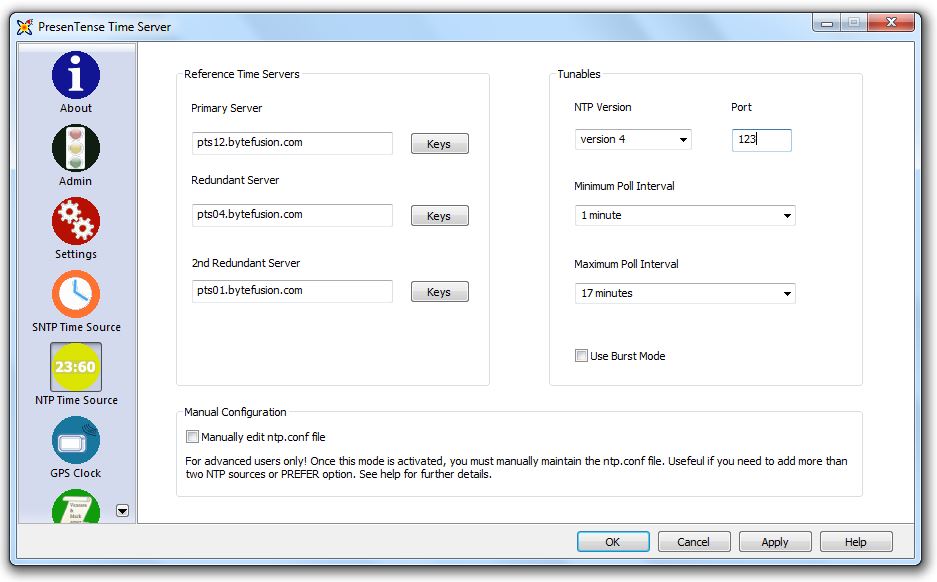
PresenTense Time Server generates the configuration file NTP.CONF for the NTP4 plug-In automatically from the settings you specify or you can edit this configuration file directly. The latter is only recommended for advanced users. Please refer to the parameter list shown below for a detailed explanation of each parameter / setting.

Reference Time Servers
This option allows you to specify one primary and two redundant time servers which PresenTense Time Server will then synchronize. You may specify either an IP address, hostname, or DNS name for the servers. If you elect to specify a hostname or DNS name, please ensure that name resolution is properly configured on your TCP/IP network. If you decide to synchronize to a time server on the internet rather than a corporate time server, ensure also that firewall rules permit the network traffic for the protocol you select. Time servers specified here should support version 3 or 4 of the NTP protocol. Click the key icon to select an encryption key to be used to authenticate each server if you require secure NTP. Authentication uses the MD5 secure hash algorithm. See also NTP4 Key Generator.
NTP Version
This option allows you to specify the version number to be used for outgoing NTP packets. Possible values are version 3 and version 4. Regardless of the value chosen here, the NTP plug-in will service clients of both version 3 and 4 when it itself is queried by other NTP hosts.
NTP Port
This option allows you to specify an alternate NTP port. By convention, the NTP protocol operates on port 123 and in all but the most extraordinary circumstances you will want to use port 123 in order to retain compatibility with other NTP systems. Some circumstances however warrant changing the default NTP port. If you operate PresenTense Time Server on a local area network behind a firewall which blocks incoming traffic to privileged ports (<1024) and are unable or not permitted to reconfigure your firewall to suit, you might wish to reconfigure the NTP4 plug-in to operate on an alternate port. Be advised that you will need to adjust any time client software to use the new port settings also.
Minimum Poll Interval
This option allows you to specify the minimum poll interval for NTP messages. Typically the NTP4 plug-in will poll time servers at the rate specified as the minimum poll interval until the algorithm has achieved synchronization of the local system with its accurate time source(s).
Maximum Poll Interval
This option allows you to specify the maximum poll interval for NTP messages. After synchronization with its accurate time source(s) has been achieved, the NTP4 Plug-In may grow the interval between queries to its accurate time source(s) up to the maximum poll interval or as required to maintain synchronization.
Use Burst Mode
This option tells the NTP4 plug-in to use eight packets instead of the usual one packet when polling a time server. When enabled, this option considerably increases timekeeping accuracy however also increases network traffic. On a busy network with a lot of time clients, this option may decrease accuracy due to increased incremental backoff at the ethernet packet level. Use with caution.
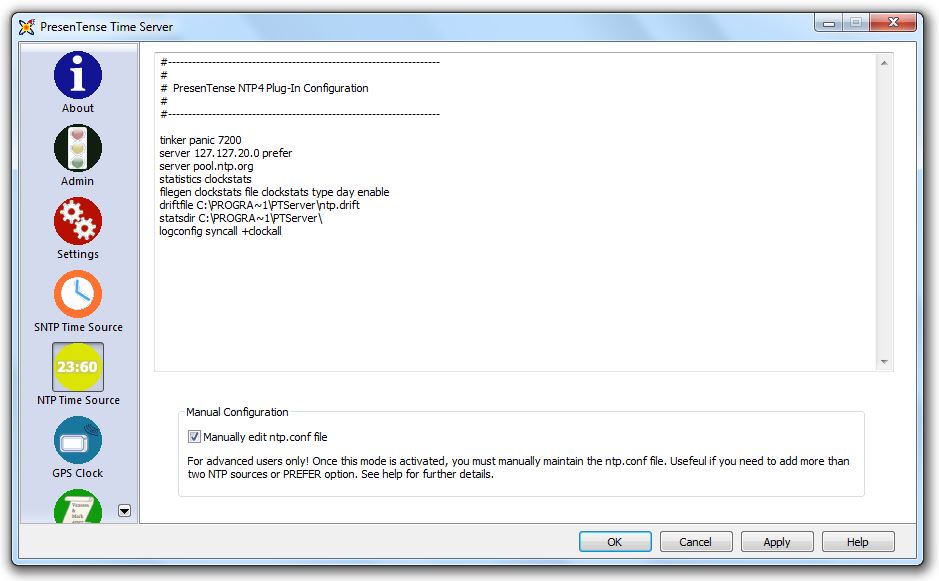
Manually edit ntp.conf file
This option allows you to switch to direct edit mode. In direct edit mode, you are free to compose your own NTP.CONF file. This option is recommended for advanced users only.

Once you have edited the ntp.conf file manually, you should not use the GUI to make any further changes as your manual modifications may be overwritten. Should you make a change in manual edit mode which renders your server dysfunctional, uncheck the manual edit mode, modify the GUI settings and click apply. A functional ntp.conf will be generated.